


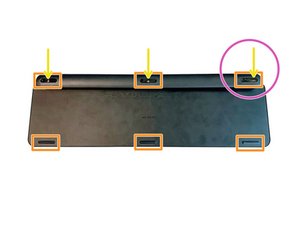
- Remove the rubber gliders on the backside:
The three gliders on the top are necessary in this step, but you will remove the bottom three later anyway so best to do all six at the same time. - Unscrew the three screws behind the top rubber gliders:
In my case the glue/adhesive covered them - Use the iFixit toolkit / picks to open the cover
- Remove the battery:
Unplug and remove, It’s lightly glued on the backside - Unscrew the little black screw on the PCB which clamps the antenna cable
- Unscrew the PCB:
Three kind of big silver head screws - Remove the PCB
- Unplug data cable:
Lift the adhesive tape, then the white part / connector pulls up to release the cable - Remove all silver and black screws
- The backplate cover:
Start in the left top and lift / pull very slowly until you completely remove it. It’s pretty robust, but the adhesive is very strong, so take your time on this step. - Unscrew all the little black screws and the remove the metal baseplate
I have uploaded pictures, so please take a look at them if needed
Hope this helps and thanks to all the guys that helped
Remove the rubber-feet from the underside
The three up top are necessary for this step, but we'll be removing the bottom three later, so best to do them all at the same time
Unscrew the three screws behind the top rubber feet
Note the leftmost screw is offset to the right, and not in the center
In my case the adhesive physically covered the screws - Lightly press with a small Phillips [PH 0] and you'll find them
Use a plastic opener to remove the cover
Remove the battery. Note it's lightly glued on the underside.
Unscrew two (slightly larger, silver) phillips screws that secure the PCB
Unscrew the last small black PCB screw on the top right corner
Remove the orange tape securing the serial cable (put it to one side, you'll need to put it back if reassembling)
Remove the small jumper with twisted red/black wires coming from it
Carefully lift the serial connector (it's hinged) and lift the data cable up and away
Remove PCB
Remove last PCB screw
Unscrew all the black screws along the top (9)
You'll have to remove the "head" of the keyboard which is attached with latches that click in. Use a plastic tool to help. It should separate completely from the keyboard.
Be careful trying to separate the layers of the keyboard. You may damage the backlight guide.
-
 微信公众号
微信公众号