


Follow this guide to open up your K380 to:
- Fully remove liquid or particles from inside
- Access its small logic board
- Re-align the battery connectors
- Address problems with the power switch
Or otherwise get inside.
Note: Some steps in this guide may show a different-colored K380 keyboard. K380 models are identical, minus their individual keys and colors.
Note: The keys themselves are riveted to a hard metal board inside the case; accessing or replacing them is not easy or advised.
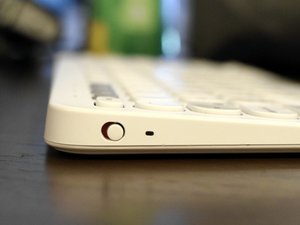
Power off the keyboard using the switch on the upper-left corner. You should see a feint red color beneath the swtich.
Turn the keyboard over. Pinch the battery compartment at the small finger groove, then lift and remove the battery cover.
Remove the two AA batteries by sliding them to the right and pulling them out.
Use a Phillips #0 driver to remove the two black screws that were covered by the battery compartment
Using an opening tool, pick, the flat end of a spudger, or another plastic prying tool (not metal) to pry under the rubber feet at each corner. Move your tool in a circle around the foot to release all the adhesive.
Keep the feet adhesive-side up in a clean place—you should be able to re-adhere the feet multiple times.
Use a Phillips #0 driver to remove the four screws from underneath each of the rubber feet.
Keep the screws from the top and bottom of the keyboard separate and labeled, as they are different sizes.
Insert a pick between the bottom cover and the outer frame. It's easier to start near the top, where your pick can sink deeper and provide more leverage.
Pull the bottom cover up by prying with your pick. You will hear clicks or pops as clips release; this is normal and non-damaging.
Once your first pick is wedged between the cover and case, insert a second pick nearby. Slide it around the perimeter, prying as you go to release more clips.
Once you've loosened the bottom cover enough, you can use your fingers to pull off the bottom cover. Try twisting the cover slightly, and pulling on different sections, to release more clips and gain leverage.
Remove the back cover and set it aside.
With the bottom cover removed, you can rotate and shake the unit to release liquids or particles, and inspect one side of the logic board for water damage.
Do not pull up on the wide, flat ribbon cable connecting the logic board to the key sensors at bottom. You can pull this up once it is disconnected from the logic board.
Pull the small metal battery connector out of its notch on the left-hand side of the battery compartment.
Do not attempt to fully remove the battery connector, as the right side is soldered to the logic board.
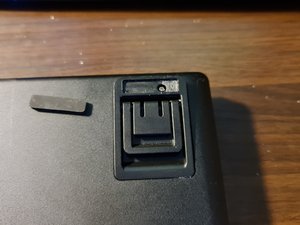
Use a Phillips #0 driver to remove the two screws holding down the logic board, on either side of the cable connector.
Use the tip of a spudger, an opening tool, or your fingernail to flip up the small, hinged locking flap on the ribbon cable's ZIF connector up, toward the top of the keyboard case.
Gently slide the ribbon cable straight out of the connector.
Gently lift up on the right side of the battery connector to release it from its bracket.
Grasp the logic board by its edges and gently raise it up and out of the case.
The power switch bracket and LED light prism are fairly loose, but you may need to wiggle the board slightly to raise it up and out from underneath them.


-
 微信公众号
微信公众号